
It’s Friday night after a long week of work, and you’re ready to cut loose. The weatherman is yapping on the news channel about how this weekend will be perfect temperatures and cloudless skies. Your mind wanders to that bike in your garage, and you start thinking about how a ride is in order. Whether you have ridden that bike every day to work this week, or you are just taking it out of the garage from the winter, giving your bike a quick motorcycle check is the best way to start a ride. Personal protective equipment is essential, but to protect yourself adequately, you must ensure the bike you are going to ride is also safe.
Making Sure Your Bike Is Ready For The Ride
 When you went to the required motorcycle school, you may have learned that the Motorcycle Safety Foundation gives a three-minute inspection time, there is no set timetable for inspecting your bike. If you ride your motorcycle daily, then you know what to expect, but if you are just pulling your bike out for the first time from the winter, you may want to pay more attention to the details.
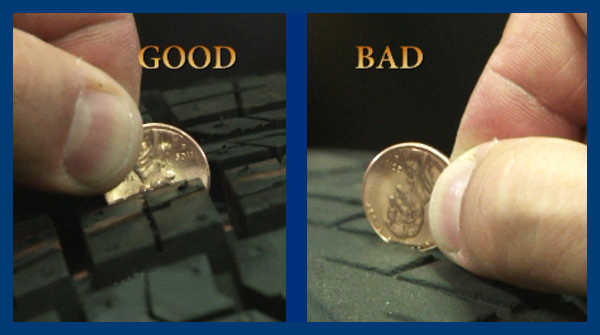
- Tires and Wheels - Look for wear spots, dry rot, and anything that has lodged itself in the tread. Use the penny test to check for tire wear. While you are down there looking, check your tire pressure. Then make sure your spokes are tight and straight, and there are no dings in your rims. Check that there is no bend in your rim. An easy way to do this is to raise the motorcycle on a bike jack and spin the wheel while looking directly down the wheel from tire to hub.
- Things That Stick Out - Inspect your control levers for proper function, as well as structural integrity. Ensure the handlebars are secured properly, the brake and throttle cables move freely, and show no wear. Inspect hoses for nicks, bulges, and connection points. Check mirrors to ensure they are tightly attached and free from obstructions.
- Electrical Stuff - Start by inspecting the battery. Open your battery compartment and ensure the terminals are clean the terminal wires are tight. Next, flip the key to on and check the headlights, taillights, and turn signals (both front and back). Flip the headlights from low beam to high beam and back to low. Check the brake lights using both the pedal and the lever. Look for cracks and obstructions on each light lens.
- Fluids - Fluids keep your bike running cool, and are equated to the blood of your bike. Start by inspecting the coolant level, which should always be checked while the bike is cold. Next, check the brake, transmission and gear oil. Then check the oil while the bike is warm, using the dipstick or oil sight glass while the bike is upright and level. Look for leaks from hoses and gaskets.
- Body Check - Take a walk around your bike and look at the body. Often, the best time to do this is when you are washing and waxing your bike. Look at the front forks to see that they have equal travel and pressure, check rear shocks for smooth travel and load. Examine the chain or belt for tension and lubrication. Test all fasteners to be sure that nothing has been sheared off or rattled loose.
While a pre-ride inspection may take a few minutes of your day, an accident can occur in a split second, and the effects can last a lifetime. Print and laminate a safety checklist and keep it in your garage where you keep your bike to be sure that you never miss a detail. Protect yourself, and protect your investment by taking a walk around your bike before every ride!
Keep the shiny side up and the greasy side down!
